Рекомендации по переводу
This manual is aiming to help the translator. First the general process of how technically a translation is done is explained. Later the translation is explained from an actual English rst document that is translated to Dutch. Finally a summary of “Rules of translation” is given.
Foreword
A first important note: If you want to translate content within the docs folder (not web), never do this in the master branch. For translations there are always translation branches available, once a document is fully updated in english for a certain version. As an example the branch to translate the manual of QGIS 1.8, you have to use the manual_en_v1.8 branch. For questions, please contact the qgis-community-team at http://lists.osgeo.org/mailman/listinfo/qgis-community-team.
General information
Для иллюстрирования процесса перевода мы возьмем описание модуля теплокарта. В этом примере мы выполним перевод с английского на голландский, но общие принципы будут одинаковы и для остальных языков и документов.
First translation
To create documentation first rst documents are created. A prebuild script creates translation files named .po files for the english language in the folder /QGIS-Documentation/i18n/en.
Эти «оригиналы» копируются скриптом в подкаталоги других языков внутри каталога i18n.
The sentences in the .po files needs to be translated from english to the language with a translation tool editor. There is a web translation tool called pootle we would like to use, but it is not activated yet. However there is an excellent tool supplied with the qt development tools named Qt Linguist.
When you want to contribute, first get a .po file and add translations for the sentences in the .po file.
When you are finished the .po file is placed back in the right place and during the next build the buildscript now creates .mo files next to the .po files.
These .mo files are actually used by the script to create translated output.
Update translations
When afterwards an rst document is updated a new .po file is created in the english part. The contents of this new file will be merged with already existing .po files for each language. This means that when a new line is added to an rst document that was allready translated, only the new/updated sentences are added in the translated .po file and needs to be translated. The amount of work for updating translations for next versions of QGIS should be relative small.
Translate a .po-file
For this example we will use the relative smaller rst document for the heatmap plugin. The source of the document can be found here:
QGIS-Documentation/source/docs/user_manual/plugins/plugins_heatmap.rst
Почему мы выбрали именно этот файл?
Он соответствует текущей версии QGIS. Если документ не обновлялся для соответствия текущей версии QGIS, в его начале будет следующий текст.
|updatedisclamer|
Эта строка создаёт в конечном документе блок с предупреждением. Если начать переводить документ с такой строкой, то скорее всего в дальнейшем к нему придется вернуться.
Кроме того, файл содержит изображения, подзаголовки, ссылки и подстановки.
И кроме того, его автором являюсь я, так что мне проще его переводить ;-).
The build process has created the English .po file which can be found here:
QGIS-Documentation/i18n/en/LC_MESSAGES/docs/user_manual/plugins/plugins_heatmap.po
The equivalent Dutch .po file (basically a copy) can be found here:
QGIS-Documentation/i18n/nl/LC_MESSAGES/docs/user_manual/plugins/plugins_heatmap.po
Along this file you will see a tiny .mo file which indicates that it does not hold any translations yet.
Now I will grab this .po file and start translating it. During this translation session I will point out which parts (rst statements) need translation.
Перевод в Qt Linguist
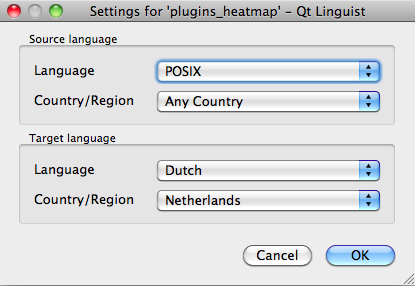
When you open the .po file in Qt Linguist for the first time you will see the following dialog:
Figure Translation 1:
Поле «Язык перевода» должно быть заполнено правильно. В поле «Исходный язык» можно оставить значение по умолчанию POSIX, аналогично и с полем «Страна/Регион» — там можно оставить «Любая страна».
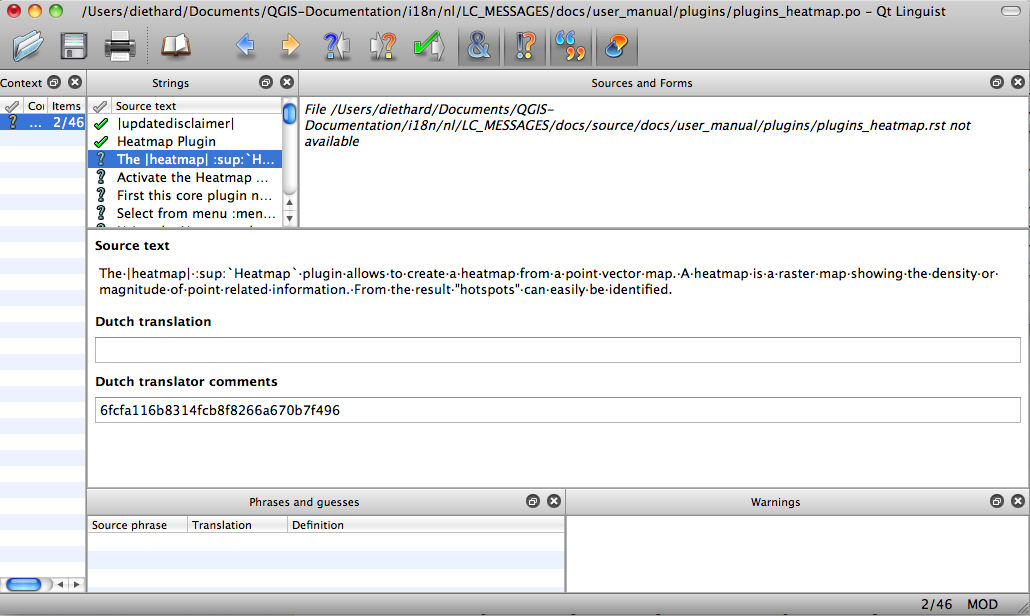
When you press the [OK] button Qt Linguist is filled with sentences and you can start translating, see Figure translation 2.
Figure Translation 2:
На панели инструментов находится ряд кнопок, облегчающих работу.
The Translation Done Next button, is the most important button. If the item needs translation, you enter a translation in the text field, then hit this button. If the item does not translation just leave the text field for translation empty and also hit this button which indicates the item is done and you continue with the next item.
linguist_next_todo| Следующий незавершённый перевод — выполняет переход к первому непереведённому элементу. Полезна, когда исходный документ был изменён и только новые/одновлённые строки нуждаются в переводе.
Предыдущий незавершённый перевод, выполняет поиск в обратном направлении и переходит к первому найденному непереведённому элементу.
Перевод руководства пользователя
Теперь можно начинать перевод файла plugin_heatmap!
The first two items do not need translation, just push the toolbar button which considers the translation finished and jump to the next item.
When I get to the third item we see a more interesting sentence to translate:
The |heatmap| :sup:`Heatmap` plugin allows to create a heatmap from a point vector map. A heatmap is a raster map showing the density or magnitude of point related information. From the result "hotspots" can easily be identified.
- Этот блок содержит два элемента разметки RST:
|heatmap| слова между | являются подстановками и никогда не переводятся! Они будут заменены другим текстом или изображением!
- :sup:`Heatmap` `` the ``:sup: statement is a superposition statement and prints the following text a bit higher. This is used to show the popup texts that appear when you hover above the toolbar item and this may be different when it is actually translated in the QGIS application. In this case it is not!
Весь остальной обычный текст можно переводить!
The fifth translation item contains the :ref: rst statement that is commonly used to refer to another section somewhere in het manual! The text following a :ref: statement should never be changed because it is a unique identifier!
First this core plugin needs to be activated using the Plugin Manager (see Section :ref:`load_core_plugin`). After activation the heatmap icon |heatmap| can be found in the Raster Toolbar.
In this case “load_core_plugin” is a unique reference identifier placed before an rst item that has a caption. The ref statement will be replaced with the text of the header and turned into a hyerlink. When the header this reference is refering to is translated, all references to this header will be automatically translated as well.
Следующий блок текста содержит элемент :menuselection: за которым следует текст пункта меню QGIS. Он должен быть переведён точно так же как и пункт меню в самом приложении.
Select from menu :menuselection:`View -->` :menuselection:`Toolbars -->` :menuselection:`Raster` to activate the Raster Toolbar when it is not yet activated.
В нашем примере «View –>» будет переведено как «Beeld –>», так как именно такой перевод используется в голландской локализации QGIS.
Чуть позже мы встретим вот такой элемент:
The |heatmap| :sup:`Heatmap` toolbutton starts the Dialog of the Heatmap plugin (see figure_heatmap_2_).
It holds a reference to a figure figure_heatmap_2_, and like a reference to section this reference should not be changed!! The reference definition itself from the rst-document is not included in the .po file and can therefore not be changed. This means the reference to figures can not be translated. When HTML is created you will see figure_heatmap_2. When a PDF document is created figure_heatmap_2_ is replaced with a figure number.
Следующий блок содержит несколько элементов разметки:
**Input Point dialog**: Provides a selection of loaded point vector maps.
Do not remove the stars in above line. It will print the text it holds in bold. The text itself is often text included in the dialog itself and may wel be translated in the application.
Следующий блок текста содержит элемент :guilabel:.
When the |checkbox| :guilabel:`Advanced` checkbox is checked it will give acces to additional advanced options.
The text Advanced of the guilabel tag may wel be translated in the QGIS application and probably needs to be changed!
The following translation item contains ``airports``. The apostrophs are used this to give text another textfont. In this case it is a literal value and does not need translation.
For the following example, we will use the ``airports`` vector point layer from the QGIS sample dataset (see :ref:`label_sampledata`). Another exellent QGIS tutorial on making heatmaps can be found on `http://qgis.spatialthoughts.com <http://qgis.spatialthoughts.com/2012/07/tutorial-making-heatmaps-using-qgis-and.html>`_.
This item also includes a hyperlink with a url and an external presentation. The url should ofcourse be left intact, you are allowed to change the external text “http://qgis.spatialthoughts.com” which is visible by the reader. Never remove the underscore at the end of the hyperlink which forms an essential part of it!!
Основные правила
- Do not change replacements like |nix|
- Do not change references that start with the tag :ref:
- Do not change references that end with an underscore like figure_1_
- Do not change the url in hyperlinks, but you may change the external description. Leave the underscore at the end of the hyperlink
- Change the contents of :sup:, :guilabel: and :menuselection:, Check if/how it is translated in the QGIS Application.
- Text between Double Stars and double apostrophes often indicate values or fieldnames, sometimes they need translation sometimes not.
- Be aware to use exactly the same apostrophes of the source text.
- Don’t end the translated strings with a new paragraph, otherwise the text will not be translated during the html generation.
Следуйте этим простым правилам и ваш перевод будет выглядеть хорошо!


