Compositor de impressão
The print composer provides growing layout and printing capabilities. It allows you to add elements such as the QGIS map canvas, legend, scalebar, images, basic shapes, arrows and text labels. You can size, group, align and position each element and adjust the properties to create your layout. The layout can be printed or exported to image formats, Postscript, PDF or to SVG (export to SVG is not working properly with some recent Qt4 versions. You should try and check individual on your system). You can save the layout as template and load it again in another session. See a list of tools in table_composer_1:
ícone |
Finalidade |
ícone |
Finalidade |
|---|---|---|---|
 |
Carregar um modelo de impressão |
 |
Salvar como modelo de impressão |
 |
Exportar para formato de imagem |
 |
Exportar para PDF |
 |
Exportar como SVG |
 |
Imprimir ou exportar para Postscript |
 |
Ver tudo |
 |
Aproximar |
 |
Afastar |
 |
Atualizar visualização |
 |
Desfazer ultima modificação |
 |
Restaurar ultima modificação |
 |
Adicionar novo mapa |
 |
Adicionar imagem ao leiaute |
 |
Adicionar rótulo (texto) |
 |
Adicionar legenda |
 |
Adicionar barra de escala |
 |
Adicionar formas básicas |
 |
Adicionar seta |
 |
Adicionar tabela de atributos |
 |
Selecionar/mover item na tela do compositor |
 |
Mover conteúdo do mapa |
 |
Agrupar itens |
 |
Desagrupar itens |
 |
Elevar itens selecionados |
 |
Abaixar itens selecionados |
 |
Mover itens selecionados para o topo |
 |
Mover itens selecionados para a base |
 |
Alinhar itens selecionados à esquerda |
 |
Alinhar itens selecionados à direita |
 |
Alinhar itens selecionados ao centro |
 |
Alinhar itens selecionados na vertical |
 |
Alinhar itens selecionados ao topo |
 |
Alinhar itens selecionados á base |
Tabela 1 Compositor: Ferramentas do compositor de impressão
Todas as ferramentas do compositor de impressão estão disponíveis nos menus e em forma de ícones na barra de ferramentas. A barra de ferramentas pode ser desativada e ativada pressionando o botão direito do mouse sobre ela.
Abrir um novo modelo no Compositor de impressão
Antes de começar a trabalhar com o compositor de impressão, você precisa carregar algumas camadas raster e vetoriais na tela do mapa QGIS e adaptar as suas propriedades conforme seja mais conveniente. Depois que tudo esteja processado e a simbologia estiver ao seu gosto, clique no icone  Novo compositor de impressão na barra de ferramentas ou selecione Arquivo ‣ Novo Compositor de impressão.
Usando o Compositor de Impressão
Ao abrir o compositor de impressão surgirá uma tela em branco na qual você pode adicionar a tela atual do projeto QGIS, legenda, barra de escala, imagens, formas básicas, norte e texto. A Figure_composer_1 mostra a visão inicial do compositor de impressão com uma caixa ativada  Grade para alinhamento , antes de quaisquer elementos serem inseridos.
Figure Composer 1:
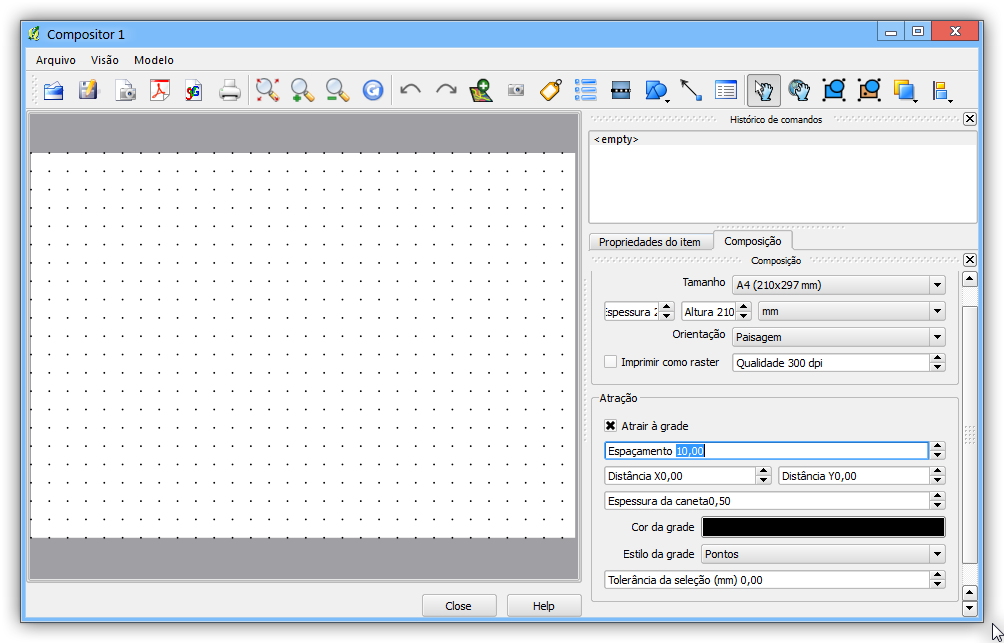
Print Composer 
O compositor de impressão apresenta três guias:
- The Composition tab allows you to set paper size, orientation, the
print quality for the output file in dpi and to activate snapping to a grid of
a defined resolution. Please note, the Snap to grid
feature only works, if you define a grid resolution > 0. Furthermore you can
also activate the Print as raster checkbox. This means
all elements will be rastered before printing or saving as Postscript of PDF.
- The Item Properties tab displays the properties for the selected
map element. Click the Select/Move item icon to select
an element (e.g. legend, scalebar or label) on the canvas. Then click the
Item Properties tab and customize the settings for the selected
element.
A guia:guilabel:’Histórico de comandos` exibe um histórico de todas as alterações aplicadas ao leiaute do compositor de impressão. Com um clique do mouse sobre um dos itens é possível desfazer ou refazer os passos de configuração do leiaute.
You can add multiple elements to the composer. It is also possible to have more than one map view or legend or scalebar in the print composer canvas. Each element has its own properties and in the case of the map, its own extent. If you want to remove any elements from the composer canvas you can do that with the Delete or the Backspace key.
Adicionando um mapa atual do QGIS ao compositor de impressão
Click on the Add new map toolbar button in the print
composer toolbar, to add the QGIS map canvas. Now drag a rectangle on the composer
canvas with the left mouse button to add the map. To display the current map, you
can choose between three different modes in the map Item Properties
tab:
- Rectangle is the default setting. It only displays an empty box with a message ‘Map will be printed here’.
- Cache renders the map in the current screen resolution. If case you zoom in or out the composer window, the map is not rendered again but the image will be scaled.
- Render means, that if you zoom in or out the composer window, the map will be rendered again, but for space reasons, only up to a maximum resolution.
Cache é o modo padrão de visualização de mapas do compositor de impressão.
You can resize the map element by clicking on the
Select/Move item button, selecting the element, and dragging one of the
blue handles in the corner of the map. With the map selected, you can now adapt
more properties in the map Item Properties tab.
To move layers within the map element select the map element, click the
Move item content icon and move the layers within
the map element frame with the left mouse button. After you found the right place
for an element, you can lock the element position within the print composer
canvas. Select the map element and click on the right mouse button to  Lock the element position and again to unlock the element. You can lock
the map element also activating the Lock layers for map
item checkbox in the Map dialog of the Item Properties
tab.
Lock the element position and again to unlock the element. You can lock
the map element also activating the Lock layers for map
item checkbox in the Map dialog of the Item Properties
tab.
Nota
QGIS is now able to show labels from the new labeling plugin also in the map composer, but it is not yet scaled correctly. So it might be necessary to switch back to the standard labeling in some cases.
Map item properties tab — Map and Extents dialog
Caixa de diálogo Mapa
The Map dialog of the map Item Properies tab provides following functionalities (see figure_composer_2):
Figure Composer 2:
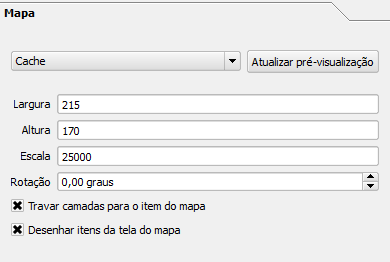
Map Dialog
- The Preview area allows to define the preview modes ‘Rectangle’, ‘Cache’ and ‘Render’, as described above. Click on the [Update preview] button to apply changes to the map view.
- The Map area allows to resize the map element specifying the width and
height or the scale. The field Rotation
 allows to
rotate the map element content clockwise in degrees. Note, a coordinate frame
can only be added with the default value 0. Furthermore you can enable the
checkboxes Lock layers for map items and
Draw map canvas items.
allows to
rotate the map element content clockwise in degrees. Note, a coordinate frame
can only be added with the default value 0. Furthermore you can enable the
checkboxes Lock layers for map items and
Draw map canvas items.
Se você mudar a visão sobre a tela do mapa QGIS pelo zoom ou alterar as propriedades vetoriais ou raster, é possível atualizar a visualização do mapa no compositor de impressão, selecionando o elemento do tipo mapa e clicando no botão [Update preview].
Caixa de diálogo Extensão
The Extents dialog of the map item tab provides following functionalities (see Figure figure_composer_3)):
Figure Composer 3:
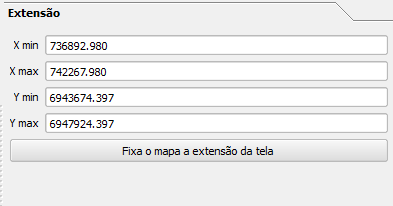
Extents Dialog
- The Map extent area allow to specify the map extent using Y and X min/max values or clicking the [Set to map canvas extent] button.
If you change the view on the QGIS map canvas by zooming or panning or changing vector or raster properties, you can update the print composer view selecting the map element in the print composer and clicking the [Update preview] button in the map Item Properties tab (see Figure figure_composer_2 a)).
Map item properties tab — Grid and General options dialog
Caixa de diálogo grid
The Grid dialog of the map Item Properties tab provides following functionalities (see Figure_composer_4):
Figure Composer 4:
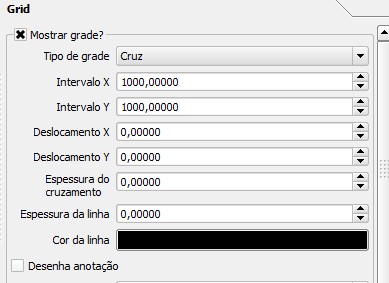
Grid Dialog
A opção
Mostrar grid permite a sobreposição de uma grade no mapa. Você pode especificar para ser aplicado o tipo de linha sólida ou cruz. Além disso, é possível definir um intervalo para as direções X e Y, e a largura usada entre as linhas X e Y da grade.A opção
Desenhar anotações permite adicionar coordenadas para o quadro do mapa. As anotações podem ser desenhadas dentro ou fora da estrutura do mapa. A direção das anotações pode ser definida como horizontal, vertical, horizontal e vertical, ou ao limite das linhas. E, finalmente, você pode definir a cor da grade, a fonte das anotações, a distância das anotações ao quadro do mapa, além da precisão das coordenadas desenhadas.
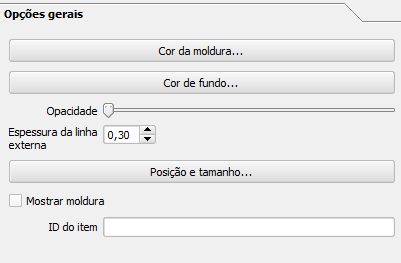
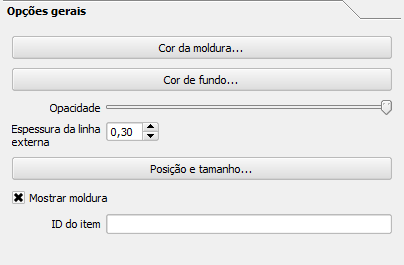
Caixa de diálogo opções gerais
The General options dialog of the map Item Properties tab provides following functionalities (see Figure_composer_5):
Figure Composer 5:
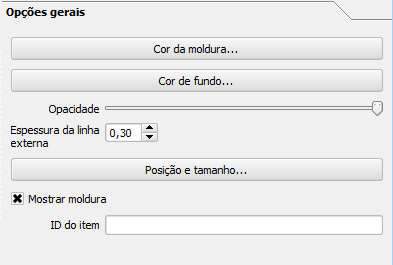
General Options Dialog
- Here you can define color and outline width for the element frame, set a
background color and opacity for the map canvas. The [Position and size]
button opens the Set item position dialog and allows to set the
map canvas position using reference points or coordinates. Furthermore you can
select or unselect to display the element frame with the
Show frame checkbox. With the Item ID you can create a
relationship to the other print composer items.
Adicionando outros elementos ao Compositor de Impressão
Além de adicionar uma tela com o mapa atual do QGIS ao compositor de impressão, também é possível adicionar, mudar a posição, mover e personalizar uma legenda, barra de escala, imagens e elementos de rotulagem.
Label item properties tab - Label and General options dialog
To add a label, click the Add label icon, place the element
with the left mouse button on the print composer canvas and position and customize
their appearance in the label Item Properties tab.
Caixa de diálogo rótulo
The Label dialog of the label item tab provides following functionalities:
Figure Composer 6:
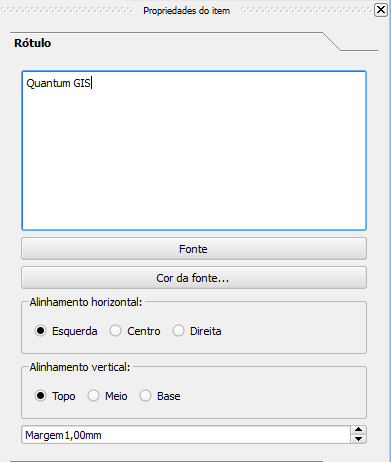
Label Options Dialog
- The Label dialog offers to add text labels to the composer canvas. You can define the horizontal and vertical alignment, select font and font color for the text and it is possible to define a text margin in mm.
Caixa de diálogo opções gerais
The General options dialog of the label Item Properties tab provides following functionalities:
Figure Composer 7:
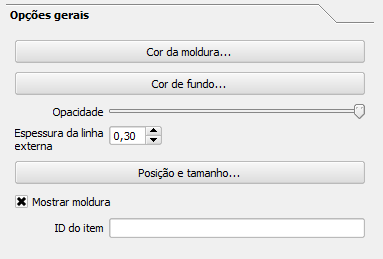
General Options Dialog
- Here you can define color and outline width for the element frame, set a
background color and opacity for the label. The Position button
opens the Set items position dialog and allows to set the map
canvas position using reference points or coordinates. Furthermore you can
select or unselect to display the element frame with the
Show frame checkbox. Use the Item ID to create a
relationship to other print composer items.
Image item properties tab - Picture options and General options dialog
To add an image, click the Add image icon, place
the element with the left mouse button on the print composer canvas and position
and customize their appearance in the image Item Properties tab.
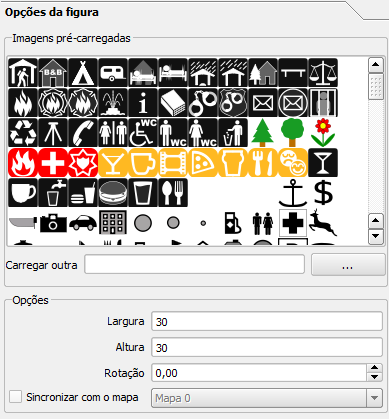
Caixa de diálogo opções da figura
The Picture options dialog of the image Item Properties tab provides following functionalities (see figure_composer_5 a):
Figure Composer 8:
Picture Options Dialog Dialog
- The Preloaded Images field then shows all pictures stored in the selected directories.
- The Options area shows the current selected picture and allows to define
width, height and clockwise rotation of the picture. It is also possible to
add a user specific SVG path. Activating the Sync with
map checkbox synchronizes the rotation of a picture in the QGIS map canvas
(i.e. a rotated north arrow) with the appropriate print composer image.
A área Buscar pastas permite adicionar e remover pastas com imagens no formato SVC para o banco de dados de imagens.
Caixa de diálogo opções gerais
The General options dialog of the image Item Properties tab provides following functionalities:
Figure Composer 9:
General Options Dialog Dialog
- Here you can define color and outline width for the element frame, set a
background color and opacity for the picture. The [Position and size]
button opens the Set item position dialog and allows to set the
map canvas position using reference points or coordinates. Furthermore you can
select or unselect to display the element frame with the
Show frame checkbox. With the Item ID you can create
a relationship to other print composer items.
Legend item properties tab - General, Legend items and Item option dialog
To add a map legend, click the Add new legend icon,
place the element with the left mouse button on the print composer canvas and
position and customize their appearance in the legend Item Properties
tab.
Caixa de diálogo geral
The General dialog of the legend item tab provides following functionalities (see figure_composer_10):
Figure Composer 10:
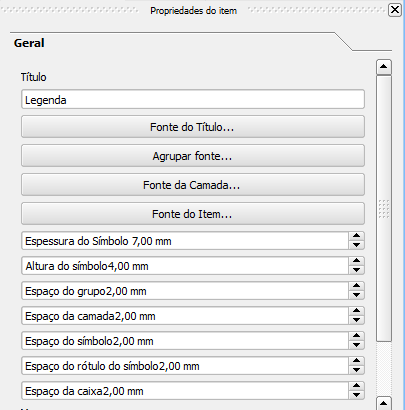
General Dialog
- Here you can adapt the legend title. You can change the font of the legend title, layer and item name. You can change width and height of the legend symbol and you can add layer, symbol, icon label and box space. Since QGIS 1.8, you can wrap the text of the legend title to a given character.
Caixa de diálogo itens da legenda
The Legend items dialog of the legend Item Properties tab provides following functionalities (see figure_composer_11):
Figure Composer 11:

Legend Items Dialog
- The legend items window lists all legend items and allows to change item order, edit layer names, remove and restore items of the list. After changing the symbology in the QGIS main window you can click on [Update] to adapt the changes in the legend element of the print composer. The item order can be changed using the [Up] and [Down] buttons or with ‘drag and drop’ functionality.
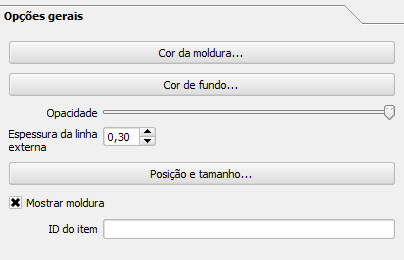
Caixa de diálogo opções gerais
The General options dialog of the legend Item Properties tab provides following functionalities (see figure_composer_12):
Figure Composer 12:
General Options Dialog
- Here you can define color and outline width for the element frame, set a
background color and opacity for the legend. The [Position and size] button
opens the Set item position dialog and allows to set the map canvas
position using reference points or coordinates. Furthermore you can select or
unselect to display the element frame with the Show frame
checkbox. Use the Item ID to create a relationship to other print
composer items.
Scalebar item properties tab - Scalebar and General options dialog
To add a scalebar, click the Add new scalebar icon, place
the element with the left mouse button on the print composer canvas and position
and customize their appearance in the scalebar Item Properties tab.
Caixa de diálogo barra de escala
The Scalebar dialog of the scalebar Item Properties tab provides following functionalities (see figure_composer_13):
Figure Composer 13:
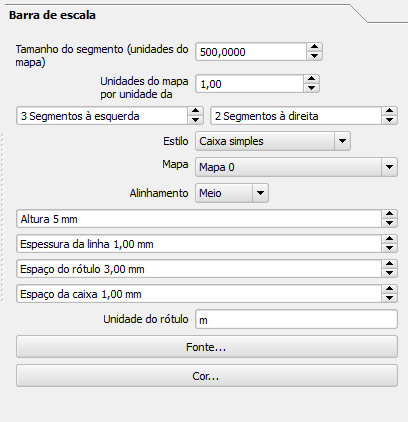
Scalebar Options Dialog
- The Scalebar dialog allows to define the segment size of the scalebar in map units, the map units used per bar units, and how many left and right segments units from 0 should be used.
Você pode definir o estilo da barra de escala disponível, como sendo simples ou dupla, o espaçamento da linha do meio, para cima ou para baixo, além do estilo numérico dos textos.
- Furthermore you can define height, line width, label and box space of the scalebar. Add a unit label and define the scalebar font and color.
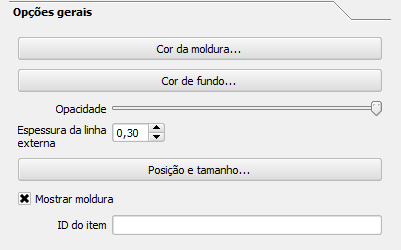
Caixa de diálogo opções gerais
The General options dialog of the scalebar Item Properties tab provides following features (see figure_composer_7 b)):
Figure Composer 14:
General Options Dialog
- Here you can define color and outline width for the element frame, set a
background color and opacity for the scalebar. The [Position and size]
button opens the Set items position dialog and allows to set the
map canvas position using reference points or coordinates. Furthermore you can
select or unselect to display the element frame with the
Show frame checkbox. With the Item ID you can create
a relationship to the other print composer items.
Ferramentas de navegação
Para a navegação em mapas, o compositor de impressão fornece quatro ferramentas:
- Aproximar
- Afastar
- Ampliar para exibir tudo
- Atualizar a exibição `(se você encontrar o ponto de vista em um estado não identificável)
Ferramentas para reverter e restaurar
Durante o processo de criação do leiaute, é possível reverter e restaurar as alterações. Isto pode ser feito com as ferramentas reverter e restaurar:
- Desfazer as ultimas mudanças
- Restaurar as ultimas mudanças
ou clicando com o mouse dentro da guia histórico de comandos (veja figure_composer_9).
Figure Composer 16:
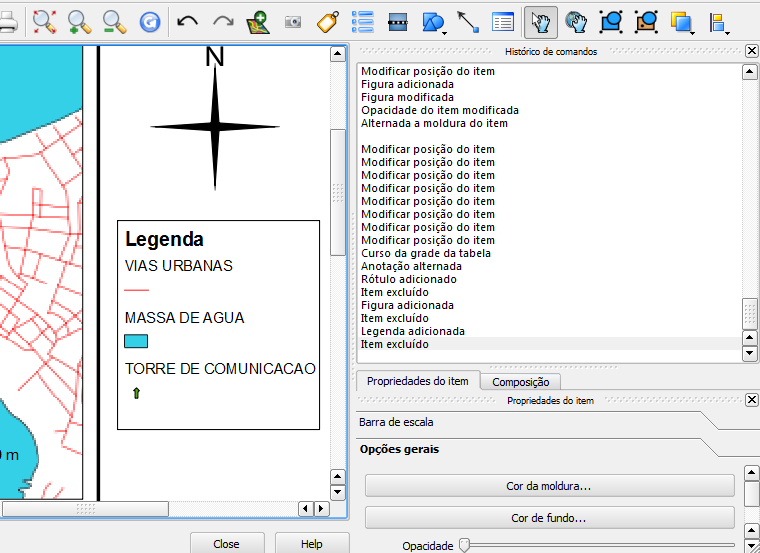
Command history in the Print Composer
Adicionando Forma básica e seta
É possível adicionar formas básicas (Elipse, Retângulo, Triângulo) e setas na tela do compositor de impressão.
The Shape dialog allows to draw an ellipse, rectangle, or triangle in the print composer canvas. You can define its outline and fill color, the outline width and a clockwise rotation.
Figure Composer 18:
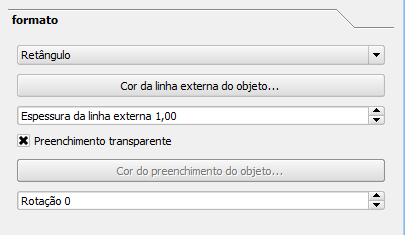
Shape Dialog
The Arrow dialog allows to draw an arrow in the print composer canvas. You can define color, outline and arrow width and it is possible to use a default marker and no marker and a SVG marker. For the SVG marker you can additionally add a SVG start and end marker from a directory on your computer.
Figure Composer 19:
Arrow Dialog
Adicionando os valores da tabela de atributos
É possível adicionar partes de uma tabela de atributos de camadas vetoriais na tela do compositor de impressão.
Caixa de diálogo tabela
The Table dialog of the attribute table item tab provides following functionalities (see figure_composer_20):
Figure Composer 20:
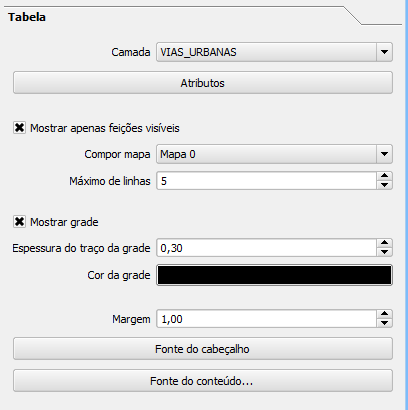
Table Dialog
- The Table dialog allows to select the vector layer and columns of the attribute table. Attribute columns can be sorted and you can define to show its values ascending or descending.
É possível definir o número máximo de linhas a serem exibidas e se os atributos são exibidos apenas para as características visíveis da tela atual do compositor.
Além disso, é possível definir as características de grade da tabela e a fonte do cabeçalho e conteúdo.
Caixa de diálogo opções gerais
The General options dialog of the attribute table item tab provides following functionalities (see figure_composer_21):
Figure Composer 21:
General Options Dialog
- Here you can define color and outline width for the element frame, set a
background color and opacity for the table. The [Position and size] button
opens the Set item position dialog and allows to set the map canvas
position using reference points or coordinates. Furthermore you can select or
unselect to display the element frame with the Show frame
checkbox. Use the Item ID to create a relationship to the other print composeritems.
Elevar, abaixar e alinhar elementos
As funcionalidades de elevar ou abaixar os elementos são encontradas no menu suspenso elevar itens selecionados. Escolha um elemento na tela do compositor de impressão e selecione a funcionalidade correspondente para aumentar ou diminuir o elemento selecionado em relação aos outros elementos (ver table_composer_1).
Existem várias funcionalidades de alinhamento disponíveis no menu suspenso Alinhar itens selecionados (ver table_composer_1). Para usar uma funcionalidade de alinhamento, primeiramente selecione alguns elementos e, em seguida, clique no ícone de alinhamento correspondente. Então, todos os elementos selecionados serão alinhados dentro de uma caixa delimitadora.
Criação de saídas
Figure_composer_22 shows the print composer with an example print layout including each type of map element described in the sections above.
Figure Composer 22:
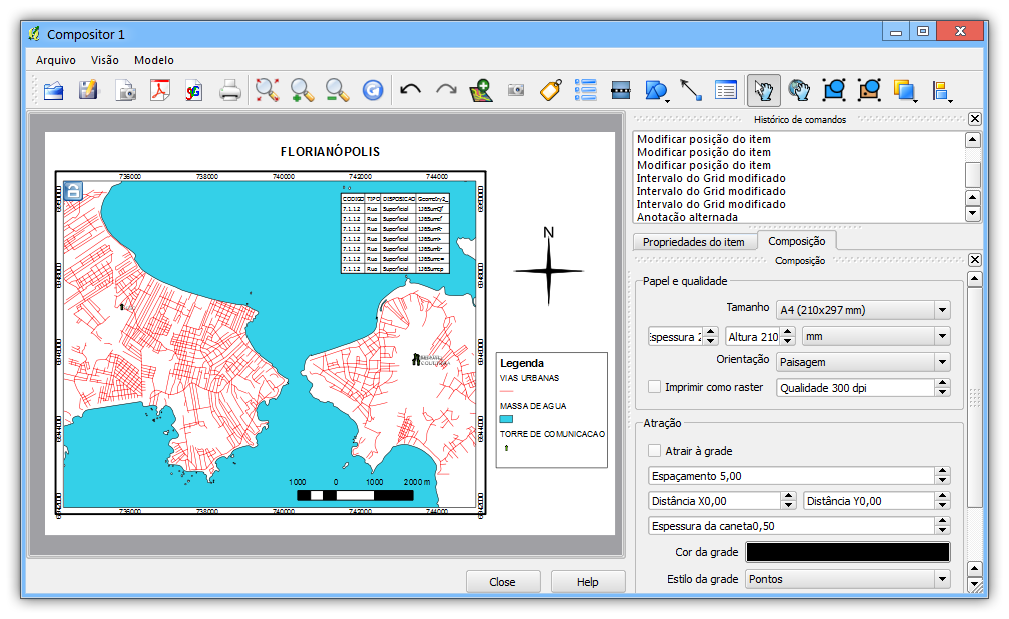
Print Composer with map view, legend, scalebar, coordinates and text added
O compositor de impressão permite criar vários formatos de saída, é possível definir a resolução (qualidade de impressão) e tamanho do papel:
O ícone
Imprimir permite imprimir o leiaute para uma impressora conectada ao computador ou em um arquivo Postscript dependendo dos drivers de impressoras instalados.- The Export as image icon exports the composer
canvas in several image formats such as PNG, BPM, TIF, JPG,...
O ícone
:sup:’Exportar como PDF`salva a tela do compositor de impressão definida diretamente como PDF.O ícone
:sup:’Exportar como SVG ` salva a tela do compositor de impressão como um SVG (Scalable Vector Graphic).
Nota
Atualmente a saída SVG é muito básica. Isto não é um problema do QGIS, mas um problema da biblioteca Qt underlaying. Esperamos que possa ser resolvido em versões futuras.
Salvar e carregar um leiaute no compositor de impressão
With the Save as template and
Load from template icons you can save the current state of a print composer
session as a .qpt template and load the template again in another session.
The  Composer Manager button in the QGIS toolbar
and in File ‣ Composer Manager allows to add a new composer
template or to manage already existing templates.
Composer Manager button in the QGIS toolbar
and in File ‣ Composer Manager allows to add a new composer
template or to manage already existing templates.
Figure Composer 23:

The Print Composer Manager